24th June 2020
MAXScript is the built-in scripting language of Autodesk 3ds Max. It allows the user to extend the functionality of 3ds Max to suit their specific needs, through customisation and automation. A solid understanding of how to use MAXScript is extremely valuable in architectural visualisation and interior design rendering. Although it is a substantial topic. In this article, we look at the simple steps to get started, followed by some practical examples of useful scripts for architectural visualisation work.
Although you can write MAXScript natively inside of 3ds Max, we do not recommend it. Our first tip is to install a program more suited to writing code. For MAXScript we suggest Sublime Text. It is a lightweight program that looks great and offers loads of helpful features for scripting. The most useful of these features is the ability to select multiple instances of a word and edit them simultaneously.
After you install Sublime Text, you will want to install Package Control. You can do this by pressing ctrl+shift+p, typing "Install Package Control" and pressing enter. Package Control allows you to extend the functionality of Sublime Text through the use of packages. Do this by pressing the same shortcut as before, typing "install" and selecting "Package Control: Install Package". From here you have access to lots of helpful packages. The most important package for us is "Send to 3ds Max". It gives us syntax highlighting, and the ability to send MAXScript to an instance of 3ds Max. We also recommend installing and activating the "Material Theme" package. It makes things much easier on the eyes.
Now we can test it by writing some code. Start by creating a new file in Sublime and saving it. Call it anything you like, but make sure to give it the extension ".ms". This tells Sublime that we are working with MAXScript. Now type in Box() and press ctrl+e to send the file to 3ds Max. Voila! a simple cube.
As an alternative to sending the whole file with ctrl+e. We can also send smaller portions of MAXScript. Do this highlighting the part of the script we want to execute and pressing shift+enter. This can be useful for testing sections of a larger script.
Now that we have got it working let's try some other commands:
-- deletes all helpers in the scene
delete helpers


-- Prepend "Light_" to the names of all lights
for light_obj in lights do
(
	light_obj.name = "Light_" + light_obj.name
)


-- Create boxes with random dimensions, wire colour and position ten times
for i = 1 to 10 do
(
	box_obj = box length:(random 0 10) width:(random 0 10) height:(random 0 10)
	box_obj.wirecolor = color (random 0 255) (random 0 255) (random 0 255)
	box_obj.position = random [-20,-20,-20] [20,20,20]
)
As you continue to use MAXScript you will discover more and more useful commands. You can read about all these in the MAXScript documentation. But frankly, it is quite overwhelming. A better place to start is with this cheat sheet. It is tremendously useful for beginners to help understand the potential of scripting.
It is also worth mentioning the MAXScript Listener MacroRecorder. Although it is far from perfect and will regularly output nothing. The MacroRecorder is a great starting point when automating a process or working out individual commands. To use it, open the MAXScript Listener with either f11 or by selecting it from the "Scripting" menu and click MacroRecorder -> Enable. Now actions you perform in 3ds Max will render out as MAXScript to the MAXScript Listener. This can help to better understand the code behind your 3ds Max actions.
So, now we have covered the basics. Let's look at how MAXScript can help us in architectural visualisation, by analysing tools we use in our production workflow. We are going to take a detailed look at the following scripts:
A relatively simple script to start with. This is one that we use in most of our visualisation projects. It goes through and sets up render elements to include all the essential passes. It might only seem like a small time saving but multiplied by every use, it adds up.
-- Create an array filled with each render element
render_elements_list = #(CESSENTIAL_Direct, CESSENTIAL_Reflect, CMasking_ID)

-- Get the current render element manager and remove all elements
render_element_manager = maxOps.GetCurRenderElementMgr()
render_element_manager.removeAllRenderElements()

-- Add all render elements to the manager
for render_element in render_elements_list do
(
	render_element_manager.addRenderElement (render_element elementname:(render_element as string))
)

-- Create an AO texture, add a Texmap render element and assign the texture
ao_texture = CoronaAO()
render_element_manager.addRenderElement (CTexmap elementname:"CTexmap_AO" Texmap:ao_texture)
As you can see in less than ten lines of code, we have a working script that sets up our render passes. It can be adapted to add more or fewer elements by amending the array in the second line.
Lines starting with "--" are comments. Comments are ignored by 3ds max and are only included to help us understand the script.
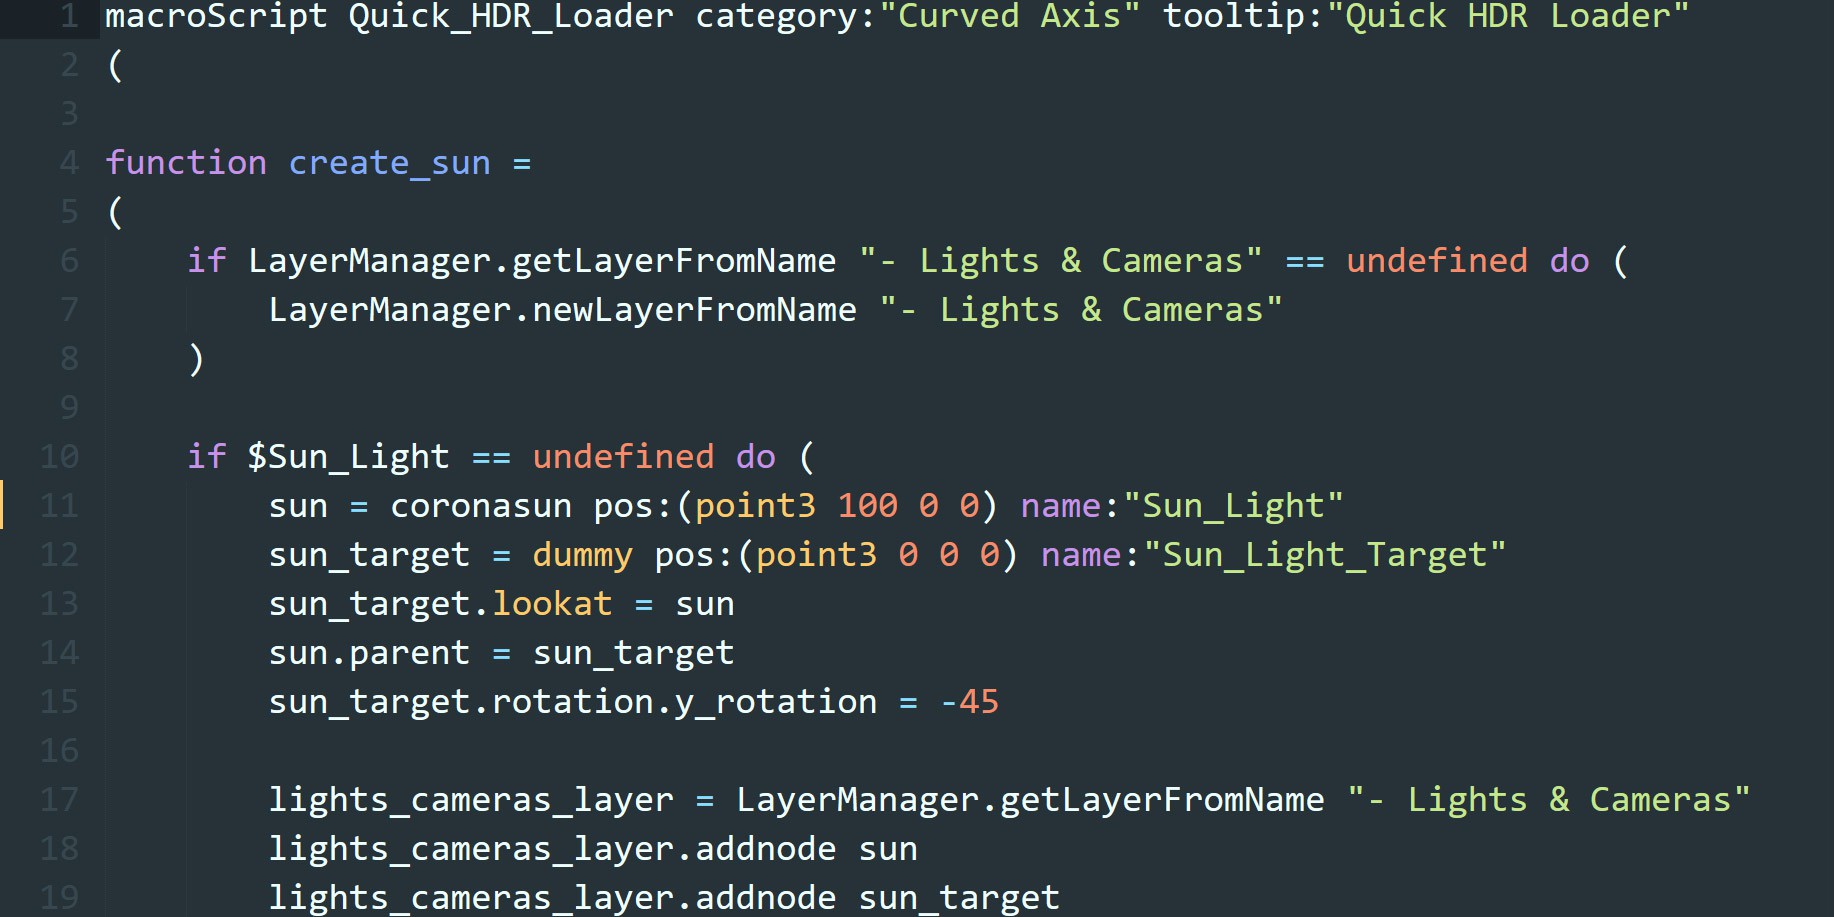
Now on to something a bit more complex. This handy tool allows us to quickly switch between any number of HDRIs. Whilst being able to tweak gamma, exposure and rotation settings. It is particularly helpful in the early stages of a project. Combining it with interactive rendering allows us to quickly test out different ideas.
-- Get the HDRI files
HDRIs = getFiles "path_to_your_HDRI_files_goes_here\*.hdr"

-- Set up an empty array, filter the HDRI paths to get their names and add them to the array
HDRI_names = #()
for HDRI_map in HDRIs do (append HDRI_names (filenameFromPath HDRI_map))

-- Set up UI Elements and state their functionality
rollout hdri_loader_ui "Quick HDR Loader"
(
	dropdownlist hdri_dropdown "HDRIs" items:HDRI_names
	group "Settings" (
		label HDR_settings_header "HDRI:" width:220
		spinner rotation_spinner "Rotation:" range:[-360,360,0]
		spinner gamma_spinner "Gamma:" range:[0,5,1] scale: 0.01
		spinner exposure_spinner "Exposure:" range:[-20,20,0] scale: 0.01
	)
	label current_HDRI_Header "Current HDRI:" offset:[0,10] width:240
	label current_HDRI "" width:240

	-- Set up environment slot and assigns the given HDRI
	function create_hdri HDRI_map =
	(
		if environmentMap == undefined do (
			setUseEnvironmentMap true
			environmentMap = CoronaColorCorrect()
			environmentMap.inputTexmap = CoronaBitmap()
		)
		environmentMap.inputTexmap.filename = HDRI_map
		hdri_loader_ui.current_HDRI.text = filenameFromPath HDRI_map
	)

	on hdri_dropdown selected i do create_hdri HDRIs[i]
	on rotation_spinner changed i do environmentMap.inputTexmap.uvwOffset = [i/360,0,0]
	on gamma_spinner changed i do environmentMap.gamma = i
	on exposure_spinner changed i do environmentMap.exposure = i
)

-- Create the UI
createDialog hdri_loader_ui 260 220
As you can see, this script introduces functions and some basic UI (User Interface) elements to help us interact with it. If you are new to scripting this might look a bit daunting. But if you break it down, the commands are still all very simple. Feel free to copy this code and give it ago (if you are using 3ds Max and Corona Renderer). The only section you will have to change is the second line so it links to your folder full of HDRIs. It should read your_hdri_path\*hdr. The asterisk is a wildcard. In this context, it tells 3ds Max to select anything in the folder that has the extension .hdr.
Here is a screenshot of the simple UI:
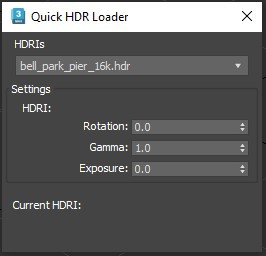
To use it, simply select an HDRI from the dropdown menu, it will then be loaded into the scene via the environment map. From here you can tweak the HDRIs various settings or select a different one.
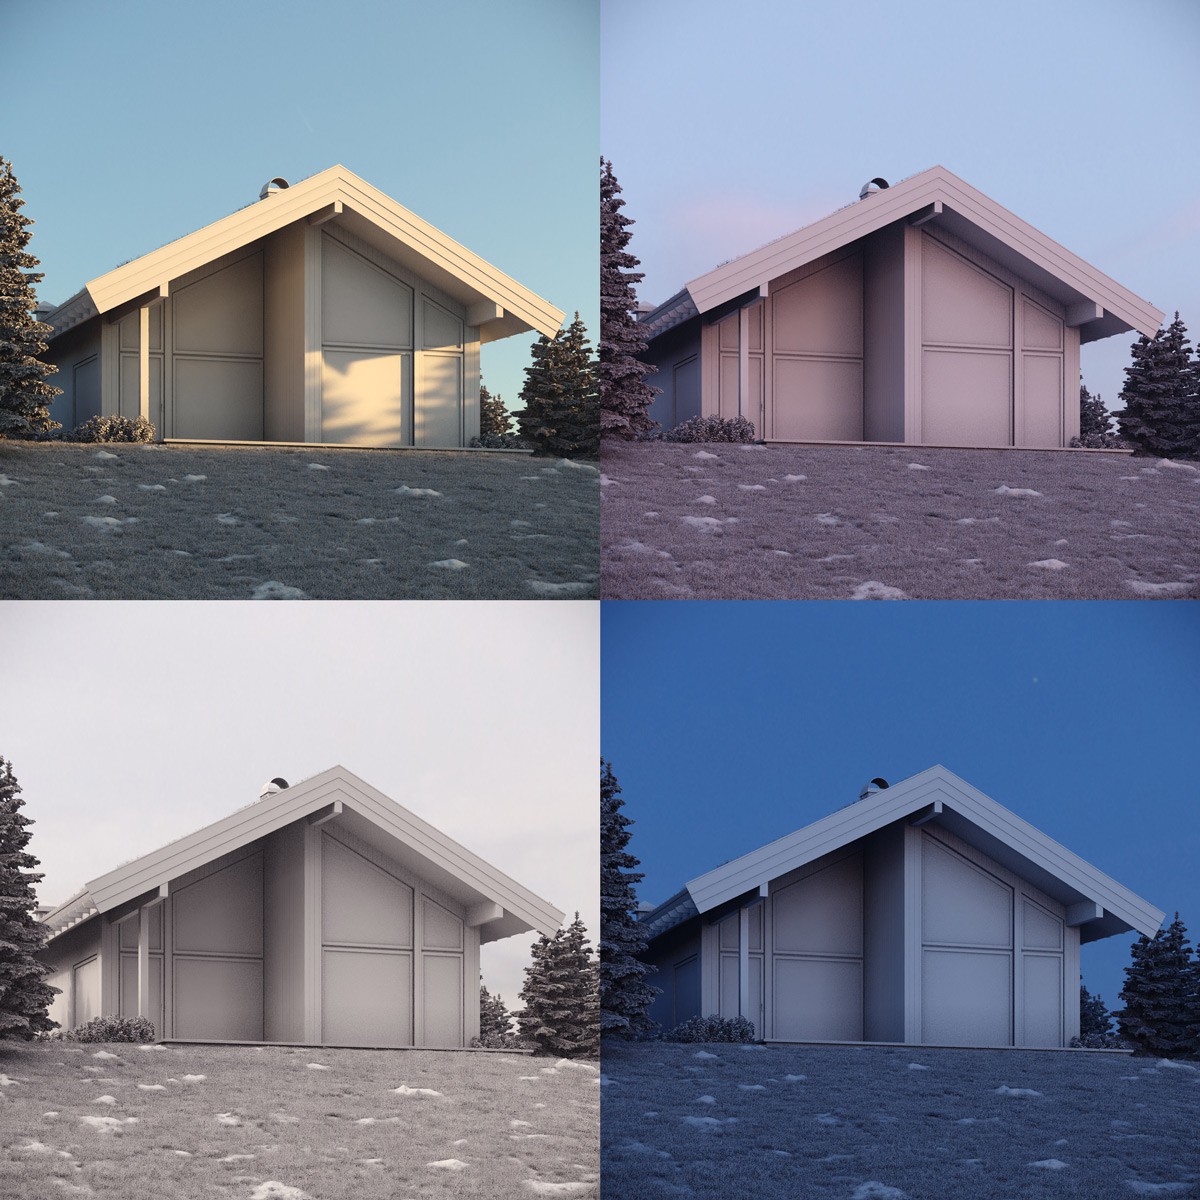
And here are some quick examples of it in use:
This script can be a huge time-saver for scenes with a large number of cameras. It gets every camera in the scene, adds them to the batch render queue and gives the view an appropriate name. We regularly make use of this script during the early stages of a project, as it allows us to quickly render out previews for lots of different camera angles and compositions that we want to test out.
-- Clear batch render queue
for i = 1 to batchrendermgr.numviews do batchrendermgr.deleteview 1

-- Get all cameras in the scene ignoring target objects
scene_cameras = for cam in cameras where classof cam != targetobject collect cam

for camera in scene_cameras do
(
	batchRender = batchRenderMgr.CreateView camera
	batchRender.name = camera.name
	fileName = getFilenameFile maxfilename
	batchRender.outputFilename = "C:\\Output\\Path" + "\\" + fileName + "_" + camera.name + ".jpg"
)

-- If batch render window is open then close and open it to refresh the queue
batchRenderWindow = windows.getchildhwnd 0 "Batch Render"
if (batchRenderWindow) != undefined do
(
	uiaccessor.closedialog batchRenderWindow[1]
	actionMan.executeAction -43434444 "4096"
)
Remember to update "C:\\Output\\Path" on line 11 to your render output location.
It is common for 3D artists and studios to have large collections of texture maps stored in an asset library. These texture maps are used to create materials which are often organised in material libraries for easier access and previewing. Manually creating materials from texture maps (particularly in large volumes) can be a repetitive and time-consuming task. This is where the script comes in handy.
Upon running the script it will ask you to select a folder containing the texture maps of your material. It searches this folder for a diffuse, gloss and normal map based on the wildcard strings provided on lines 12-14 - "*diffuse*", "*gloss*" and "*normal*". Available texture maps are then loaded into a new material, the reflection level is set to 1 and the material is given the name of the texture folder.
Some setup work may be required to get this script to run smoothly, but in the long run, it will save time and effort. We believe that it is good practice to organise textures into individual material folders and to use a consistent naming convention.
function createMaterial material_path =
(
	-- Get folder name and assign to material_name
	split_path = filterString material_path "\\ "
	material_name = split_path[split_path.count]

	-- Create material, name it and assign it to slot 1 in the material editor
	mat = CoronaMtl ()
	mat.name = material_name
	meditMaterials[1] = mat

	diffuse_path = material_path + "\\" + "*diffuse*"
	gloss_path = material_path + "\\" + "*gloss*"
	normal_path = material_path + "\\" + "*normal*"

	diffuse_map = getFiles diffuse_path
	gloss_map = getFiles gloss_path
	normal_map = getFiles normal_path

	if diffuse_map[1] != undefined do (
		mat.texmapDiffuse = CoronaBitmap fileName:diffuse_map[1]
	)

	mat.levelReflect = 1

	if gloss_map[1] != undefined do (
		mat.texmapReflectGlossiness = CoronaBitmap fileName:gloss_map[1]
	)

	if normal_map[1] != undefined do (
		mat.texmapBump = CoronaNormal ()
		mat.texmapBump.normalMap = CoronaBitmap fileName:normal_map[1]
		mat.texmapBump.normalMap.gamma = 1
	)
)

material_path = getSavepath caption:"Select Material Directory" initialDir: "C:\\Library\\Textures\\"

if (material_path != undefined) do (
	createMaterial material_path
)
Remember to update the value "C:\\Library\\Textures\\" to the location of your texture library. This will allow you to select your texture folders faster.
This MAXScript is set up to work with Corona Renderer, but with some basic tweaking, it would work with Vray or another 3ds Max renderer. Other customisations that could be useful in a production environment are - allowing multiple folders to be input and saving out a library of the generated materials, or using different wildcard strings based on the location of the folder.
Thumbnails generated by the material editor are sufficient for previewing materials most of the time. However, when working with large custom material libraries, it can be beneficial to create your own rendered previews. This allows you to have full control over the preview scene and gives you a more accurate representation of how the rendered material will look.
This MAXScript works by loading your selected material library (.mat) and cycling through the materials rendering out a preview for each. We use mostly this script on our shader ball scene but it can be used in any scene, just make to update $ShaderBall to the name of the object you want to switch materials. It is worth noting that the script does not change any render settings, so ensure these are correct before running the script. You will also want to set a pass or time limit as, without it, 3ds Max will not know when to stop rendering and move onto the next material.
Combining this with the previous material generation script can be very effective. Together they can create large numbers of materials and render them out with minimal manual interaction.
function renderMaterials material_library =
(
	-- load the selected material library and loop through each material
	loadMaterialLibrary material_library

	for mat in currentMaterialLibrary do
	(
		-- If material is a Corona material apply to shader ball and render
		if classof mat == CoronaMtl or classof mat == CoronaLayeredMtl do
		(
			$ShaderBall.material = mat
			save_file = "C:\\Output\\Path\\" + mat.name + "_Preview.jpg"
			render outputfile: save_file
		)
	)
)

-- Creates window to select material library
material_library = getOpenFileName caption:"Select Material Library" types: ".mat"

-- If material library exists run renderMaterials function
if (material_library != undefined) do (renderMaterials material_library)
Remember to update $ShaderBall and "C:\\Output\\Path\\" to your selected object and render output location respectively.
We love the workflow of developing MAXScripts using Sublime Text. Yet, opening it up every time you want to run a script would become tiresome fast. You could simply drag and drop the .ms file straight into 3ds Max. But, the best way to set up scripts you use regularly is with MacroScripts. They look something like this:
macroScript scriptName category:"CategoryName" (
your code goes here...
)
By wrapping your code in a MacroScript and running it 3ds Max makes your script accessible via the Customize -> Customize User Interface menu (using the CategoryName and scriptName you define in your code). This allows you to create toolbar buttons for your scripts, add them to quad menus and assign them to shortcuts. This is essential if you are creating a toolbox containing many scripts as it allows you to organise them effectively.
That just about covers it for this post. We hope this gives you a general overview of MAXScript and an insight into how it is used for architectural visualisation, interior design rendering and 3D animation. Feel free to copy any of the scripts we included above and put them to use in your own visualisation work. But keep in mind that the power of MAXScript is in the ability to produce custom solutions that fit your situation. We encourage you to experiment with different ideas and to create tools that speed up your own workflow and allow you to focus on being creative.
Let us know what you think! Would you like to see more content like this? Or have you got a question for us? Either way, we look forward to hearing your thoughts and continuing the discussion.
Alternatively, if you want to talk about career opportunities, discuss an upcoming project, or just say hi, we would love to hear from you too!